自动化测试之BDD
Posted on 周日 26 二月 2017 in [自动化测试]
很久没更博了,不记录点什么会觉得脑子空空的。
前些天在重构接口测试框架的时候,突发奇想的一个念头:就是要采用BDD方式来用作接口测试的数据驱动。于是花了一天时间简单学习了一下python的BDD框架-behave,并做了一个小实践。过程与结果,还算很满意。写此文章,向这些开源工具的贡献者们致敬!
什么是BDD
BDD全称Behavior Driven Development,译作 行为驱动开发,是基于TDD (Test Driven Development 测试驱动开发)的软件开发过程和方法。
BDD可以让项目成员(甚至是不懂编程的)使用自然语言来描述系统功能和场景,从而根据这些描述步骤进行系统自动化的测试。
常用BDD框架
目前常用的BDD框架有:ruby的cucumber,python的behave、lettuce等。
所实践项目 使用python开发自动化测试代码,故选用behave框架。总结从环境搭建 到运用 以及最后的测试报告集成到Jenkins上展示。
Behave使用介绍
1、安装
pip install behave ---首次安装
pip install -U behave ---更新
2、运行第一个测试
测试的功能场景——测试网站的登录功能:
账号密码输入正确--登录成功;
账号密码输入错误--登录失败。
建立框架结构
$PROJECT/
+-- features/                   -- Contains all feature files.
|       +-- steps/
|       |     +-- login.py      -- Step definitions for features.
|       +-- reports/            -- Save test reports
|       |      +-- jsonDumps/   -- Save behave json reports
|       |      +-- jsonReports/ -- Save behave to cucumber json reports
|       +-- environment.py      -- Environment for global setup...
|       +-- login.feature       -- Feature files.
Behave 框架说明:
- features/.feature文件用于编写测试场景,可以把各种场景和数据写在里面,支持中文;
- steps/.py文件就是根据所写的测试场景和数据来执行测试;
- features/.feature文件与steps/.py文件必须一一对应。
- features/.environment.py 用作测试环境统一配置。
environment.py 部分方法说明
-
before_step(context, step), after_step(context, step)
These run before and after every step. -
before_scenario(context, scenario), after_scenario(context, scenario)
These run before and after each scenario is run. -
before_feature(context, feature), after_feature(context, feature)
These run before and after each feature file is exercised. -
before_tag(context, tag), after_tag(context, tag)
These run before and after a section tagged with the given name. They are invoked for each tag encountered in the order they’re found in the feature file. See controlling things with tags. -
before_all(context), after_all(context)
These run before and after the whole shooting match. -
此实践Demo的environment.py 的代码:
# coding=utf-8
from selenium import webdriver
import behave2cucumber
import json

# 在开始全部的测试之前执行
# 此处为打开浏览器
def before_all(context):
    context.dr = webdriver.Chrome()

# 在所有的测试完成之后执行
# 此处为关闭浏览器,并将behave 的json报告转化为 cucumber兼容的json报告,便于Jenkins集成展示
def after_all(context):
    context.dr.close()
    file = r'.\reports\jsonDumps\testResult.json'
    with open(file) as behave_json:
        cucumberJson = behave2cucumber.convert(json.load(behave_json))
        jsonStr = json.dumps(cucumberJson)

    jsonReport = open(r'.\reports\jsonReports\jsonReport.json','w')
    jsonReport.write(jsonStr)
    jsonReport.close()
编写功能测试用例描述及测试数据
打开login.feature文件 写入如下内容:
功能: 登录
  @LoginSuccess
  场景: 登录成功
    假如 打开登录页面
    当 输入用户名admin,密码admin登录
    那么 跳转登录成功页面

  @LoginFailure
  场景大纲: 登录失败
    假如 打开登录页面
    当 用户名为<username>,密码为<password>时
    那么 登录失败,提示<message>

    例子: 登录失败测试用例
    |username   | password    |  message  |
    |admin       |incorrect     |错误:admin 的密码不正确。忘记密码了?|
    |empty       |admin         |错误:用户名一栏为空。          |
    |admin       |empty         |错误:密码一栏为空           |
feature文件编写说明:
- 一个feature文件中可以编写多个scenario
- 以@开头的 如@LoginSuccess 为Tags 即标签,再执行测试时可直接指定tag来运行测试用例,命令为behave --tags=LoginSuccess
- feature文件英文编写格式如下:
Feature: showing off behave

  Scenario: run a simple test
     Given we have behave installed
      when we implement a test
      then behave will test it for us!

  Scenario: comparison two numbers

     Given go to login page
      When login with admin admin
      Then login success
- feature 文件关键词说明:
1)Feature:功能名称;
2)Scenario:测试场景名称;
3)Given:给出测试前提条件;
4)when:相当我们的测试步骤;
5)Then:给出期望结果。
编写登录用例的测试代码
#coding=utf-8
from behave import *
import time

@given(u'打开登录页面')
def step_impl(context):
    context.dr.get("http://localhost/demo/login.php")

@when(u'输入用户名{username},密码{password}登录')
def step_impl(context,username,password):
    context.dr.find_element_by_id('user_login').clear()
    context.dr.find_element_by_id('user_login').send_keys(username)
    context.dr.find_element_by_id('user_pass').send_keys(password)
    context.dr.find_element_by_id('submit').click()

@then(u'跳转登录成功页面')
def step_impl(context):
    assert 'admin' in context.dr.current_url


@when(u'用户名为{username},密码为{password}时')
def step_impl(context,username,password):
    if username == 'empty':username = ''
    if password == 'empty':password = ''
    context.dr.find_element_by_id('user_login').clear()
    context.dr.find_element_by_id('user_login').send_keys(username)
    context.dr.find_element_by_id('user_pass').send_keys(password)
    context.dr.find_element_by_id('submit').click()

@then(u'登录失败,提示{message}')
def step_impl(context,message):
    displayed_msg = context.dr.find_element_by_id('login_error').text.strip()
    assert displayed_msg == message
执行测试
进入项目根目录 PROJECT/下面,执行命令behave 即执行测试 如果要将测试结果输出为json文件,则可执行:
behave --lang zh-CN -f json.pretty -o './reports/jsonDumps/testResult.json'
备注:
--lang zh-CN, feature用例描述文件内容为中文的,必须使用此参数 执行文件,否则失败
behave 其他执行命令参数 可查阅官方文档
http://pythonhosted.org/behave/behave.html#command-line-arguments
Behave测试报告展示
前置条件:
1)已搭建好Jenkins环境
2)Jenkins中的 cucumber reports插件已安装好
此任务只用作报告的展示,配置十分简单!具体功能根据实际需求另做配置!
配置步骤:
1、打开Jenkins,新建一个任务,输入任务名称-BDDTest
2、源码管理、构建触发器、构建环境、构建等模块均默认不修改
3、在构建后操作 模块中,选择【增加构建后操作步骤】--Cucumber reports
4、打开Cucumber report 的高级选项,配置behave执行测试完成后,经转化后被cucumber所兼容的json报告所在路径
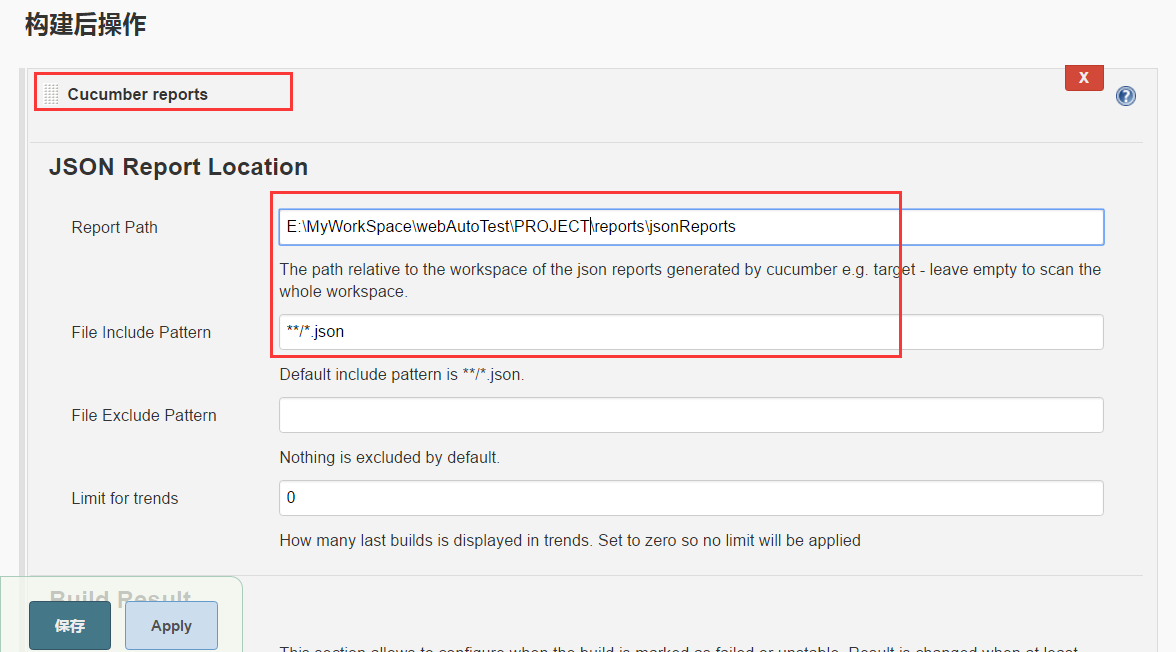
5、保存job
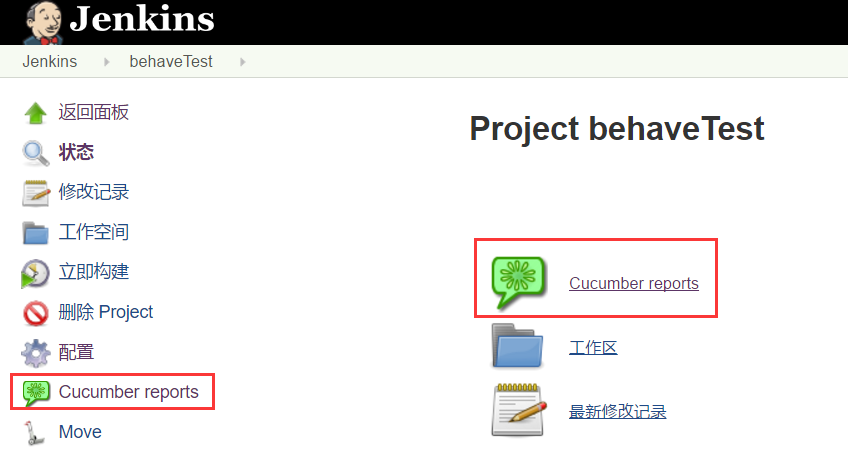
6、打开job查看,会发现在页面中出现 cucumber reports 图标 ,说明配置成功
立即构建
在Jenkins中打开任务,点击立即构建,等待构建成功结束
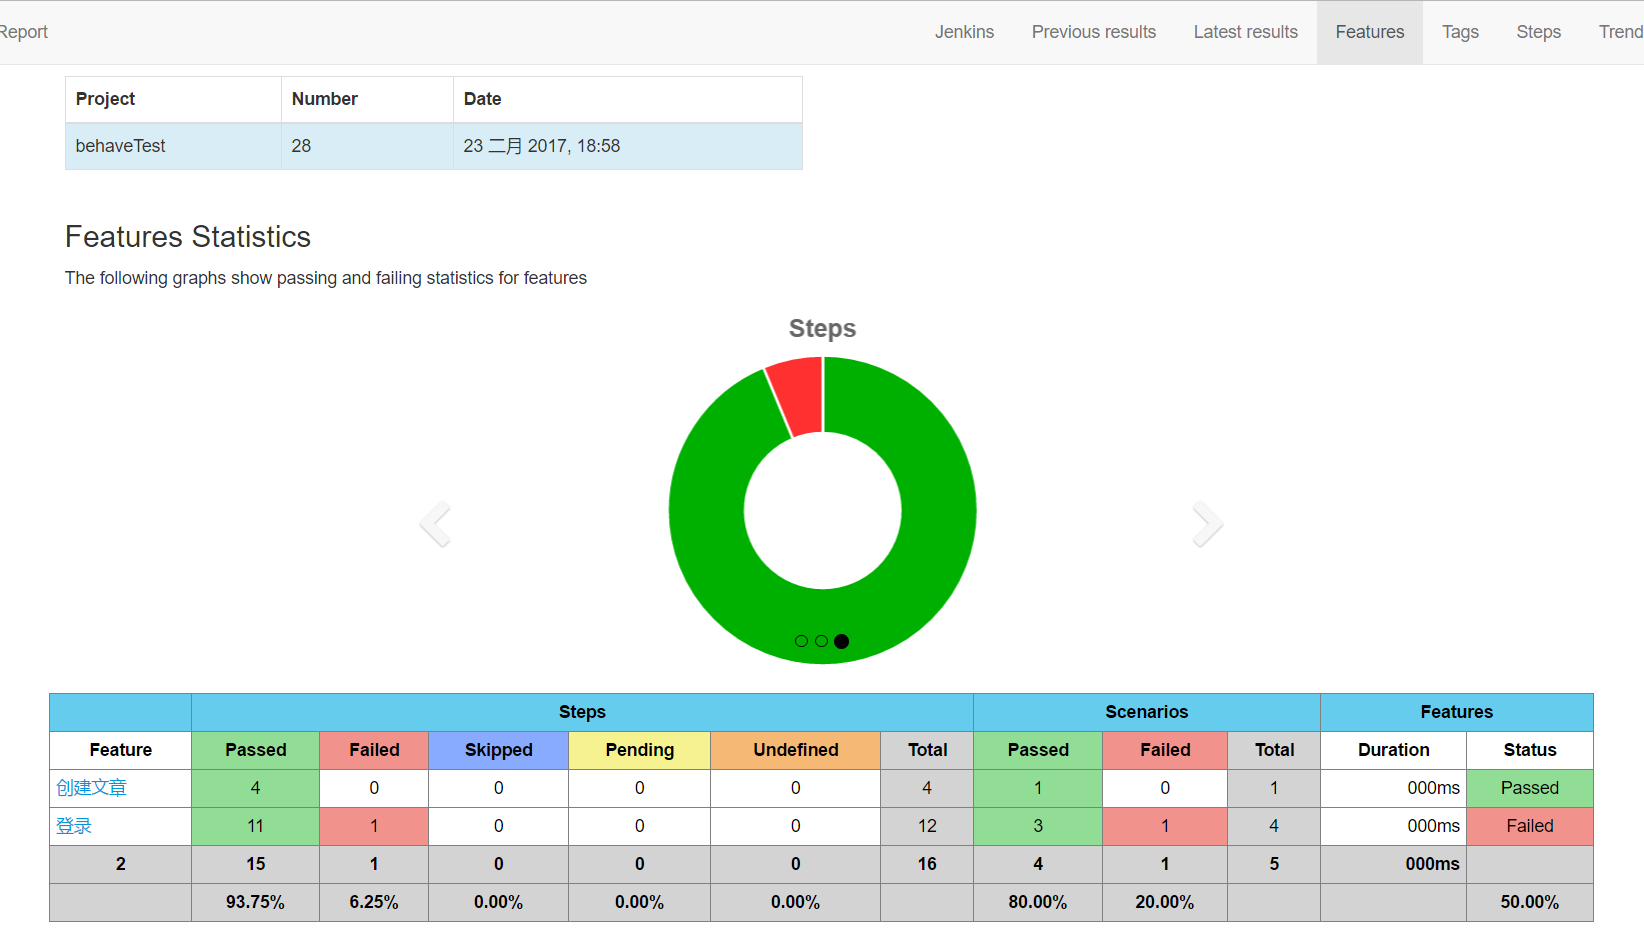
构建结束后,点击构建历史,查看测试报告
-
概览
-
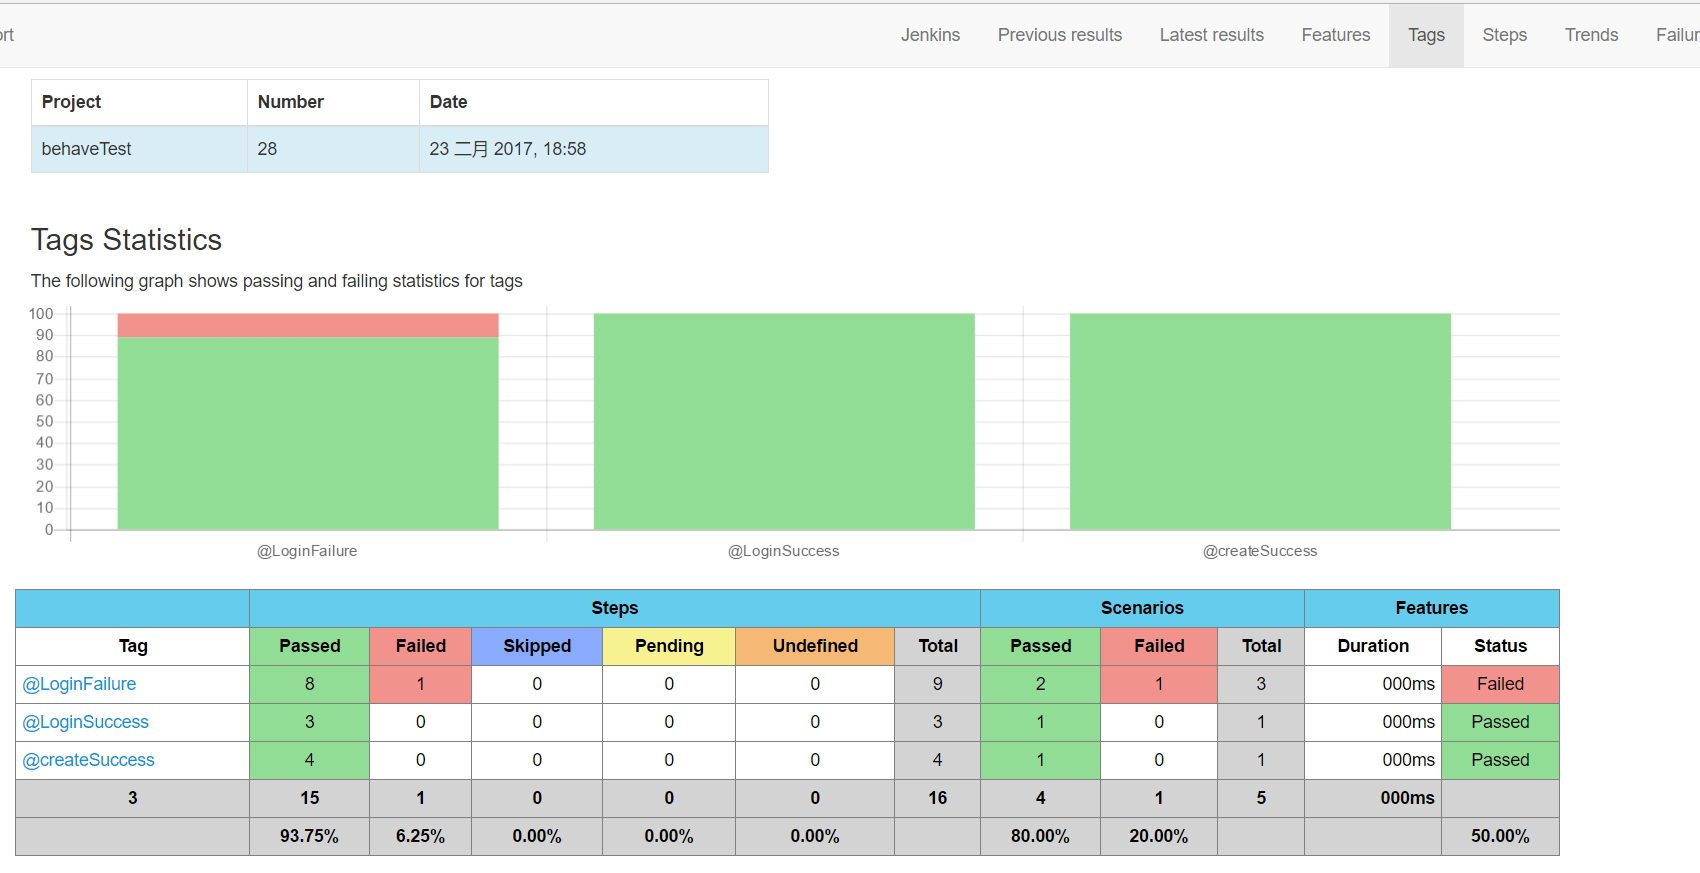
Tags报告
-
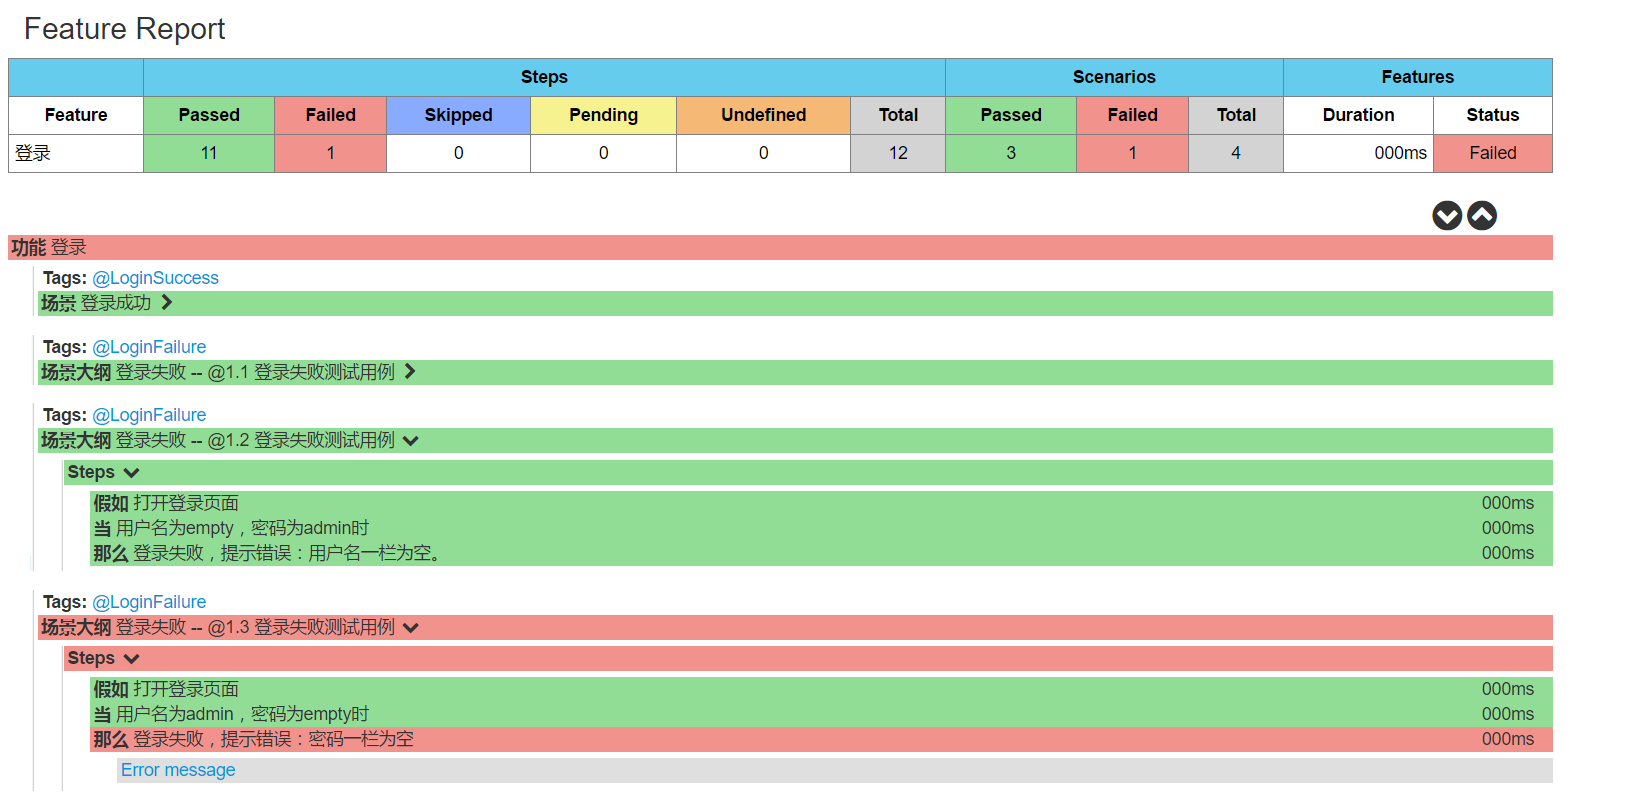
详细步骤执行情况
整个behave框架实践过程与结果的总结,就写到这吧。
当然 BDD的知识远远不止文中提到的这些,它更多强大的功能还需再今后的实践运用中发掘与总结。
愿 每天的我们 都在不断进步!